预备1 基础与 LED 灯控制
一、开发环境配置
1. 设置 Proteus 管理员权限
为避免仿真时出现权限问题,建议以管理员身份运行 Proteus 软件。
2. 创建编译环境
确保已安装 Keil C51 等单片机开发工具,并正确配置工程路径、芯片型号及编译选项。
二、认识原理图
下图为一个典型的单片机控制 LED 的原理示意图:
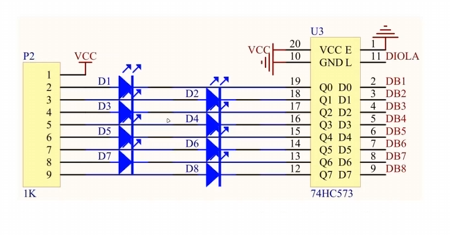
在原理图中,需要关注:
-
单片机引脚与 LED 的连接方式
-
电源与接地
-
复位电路与晶振电路
三、工程思想:引脚编码的两种格式
在单片机编程中,操作引脚有两种常见方式:
-
整体操作整个端口
例如:P1 = 0x55;一次性设置 P1 口所有引脚的电平。 -
操作单个引脚
例如:P1_0 = 0;只设置 P1 口的第 0 引脚。
四、点亮 LED(基础示例)
 /*
 这里熟一下引脚
 开发板上LED接的是P0口接上拉电阻的形式,但是Protues仿真上接的是P1口,可能是板子不一样了,也可能是P0口比较特殊的原因。
 总之,注意顺序,LED1 -> P0_0
 以此类推
 */
/* 头文件区域 */
#include <REGX52.H>
/* Main 函数 */
void main()
{
// 单片机通过循环不断执行程序
while(1)
{
// P1 = 0x55; // 整体赋值,0101 0101
P1 = 0xAA; // 整体赋值,1010 1010
P1_0 = 0; // 将 P1.0 引脚设为低电平(点亮 LED)
P2_2 = 1; // 将 P2.2 引脚设为高电平(熄灭 LED)
}
}
五、延时函数
示例1:使用 ISP 工具生成的固定延时函数
void Delay100ms(void) //@12.000MHz
{
unsigned char data i, j;
i = 195;
j = 138;
do
{
while (--j);
} while (--i);
}
示例2:可自定义时长的通用延时函数
/* 延时函数 */
void Delay(unsigned char xms) //@12.000MHz
{
while(xms--)
{
unsigned char data i, j;
i = 195;
j = 138;
do
{
while (--j);
} while (--i);
}
}
示例3:LED 流水灯效果
/* 头文件区域 */
#include "REG52.H"
#include "intrins.h"
/* 延时函数 */
void Delay(unsigned char xms) //@12.000MHz
{
while(xms--)
{
unsigned char data i, j;
i = 195;
j = 138;
do
{
while (--j);
} while (--i);
}
}
/* 变量声明 */
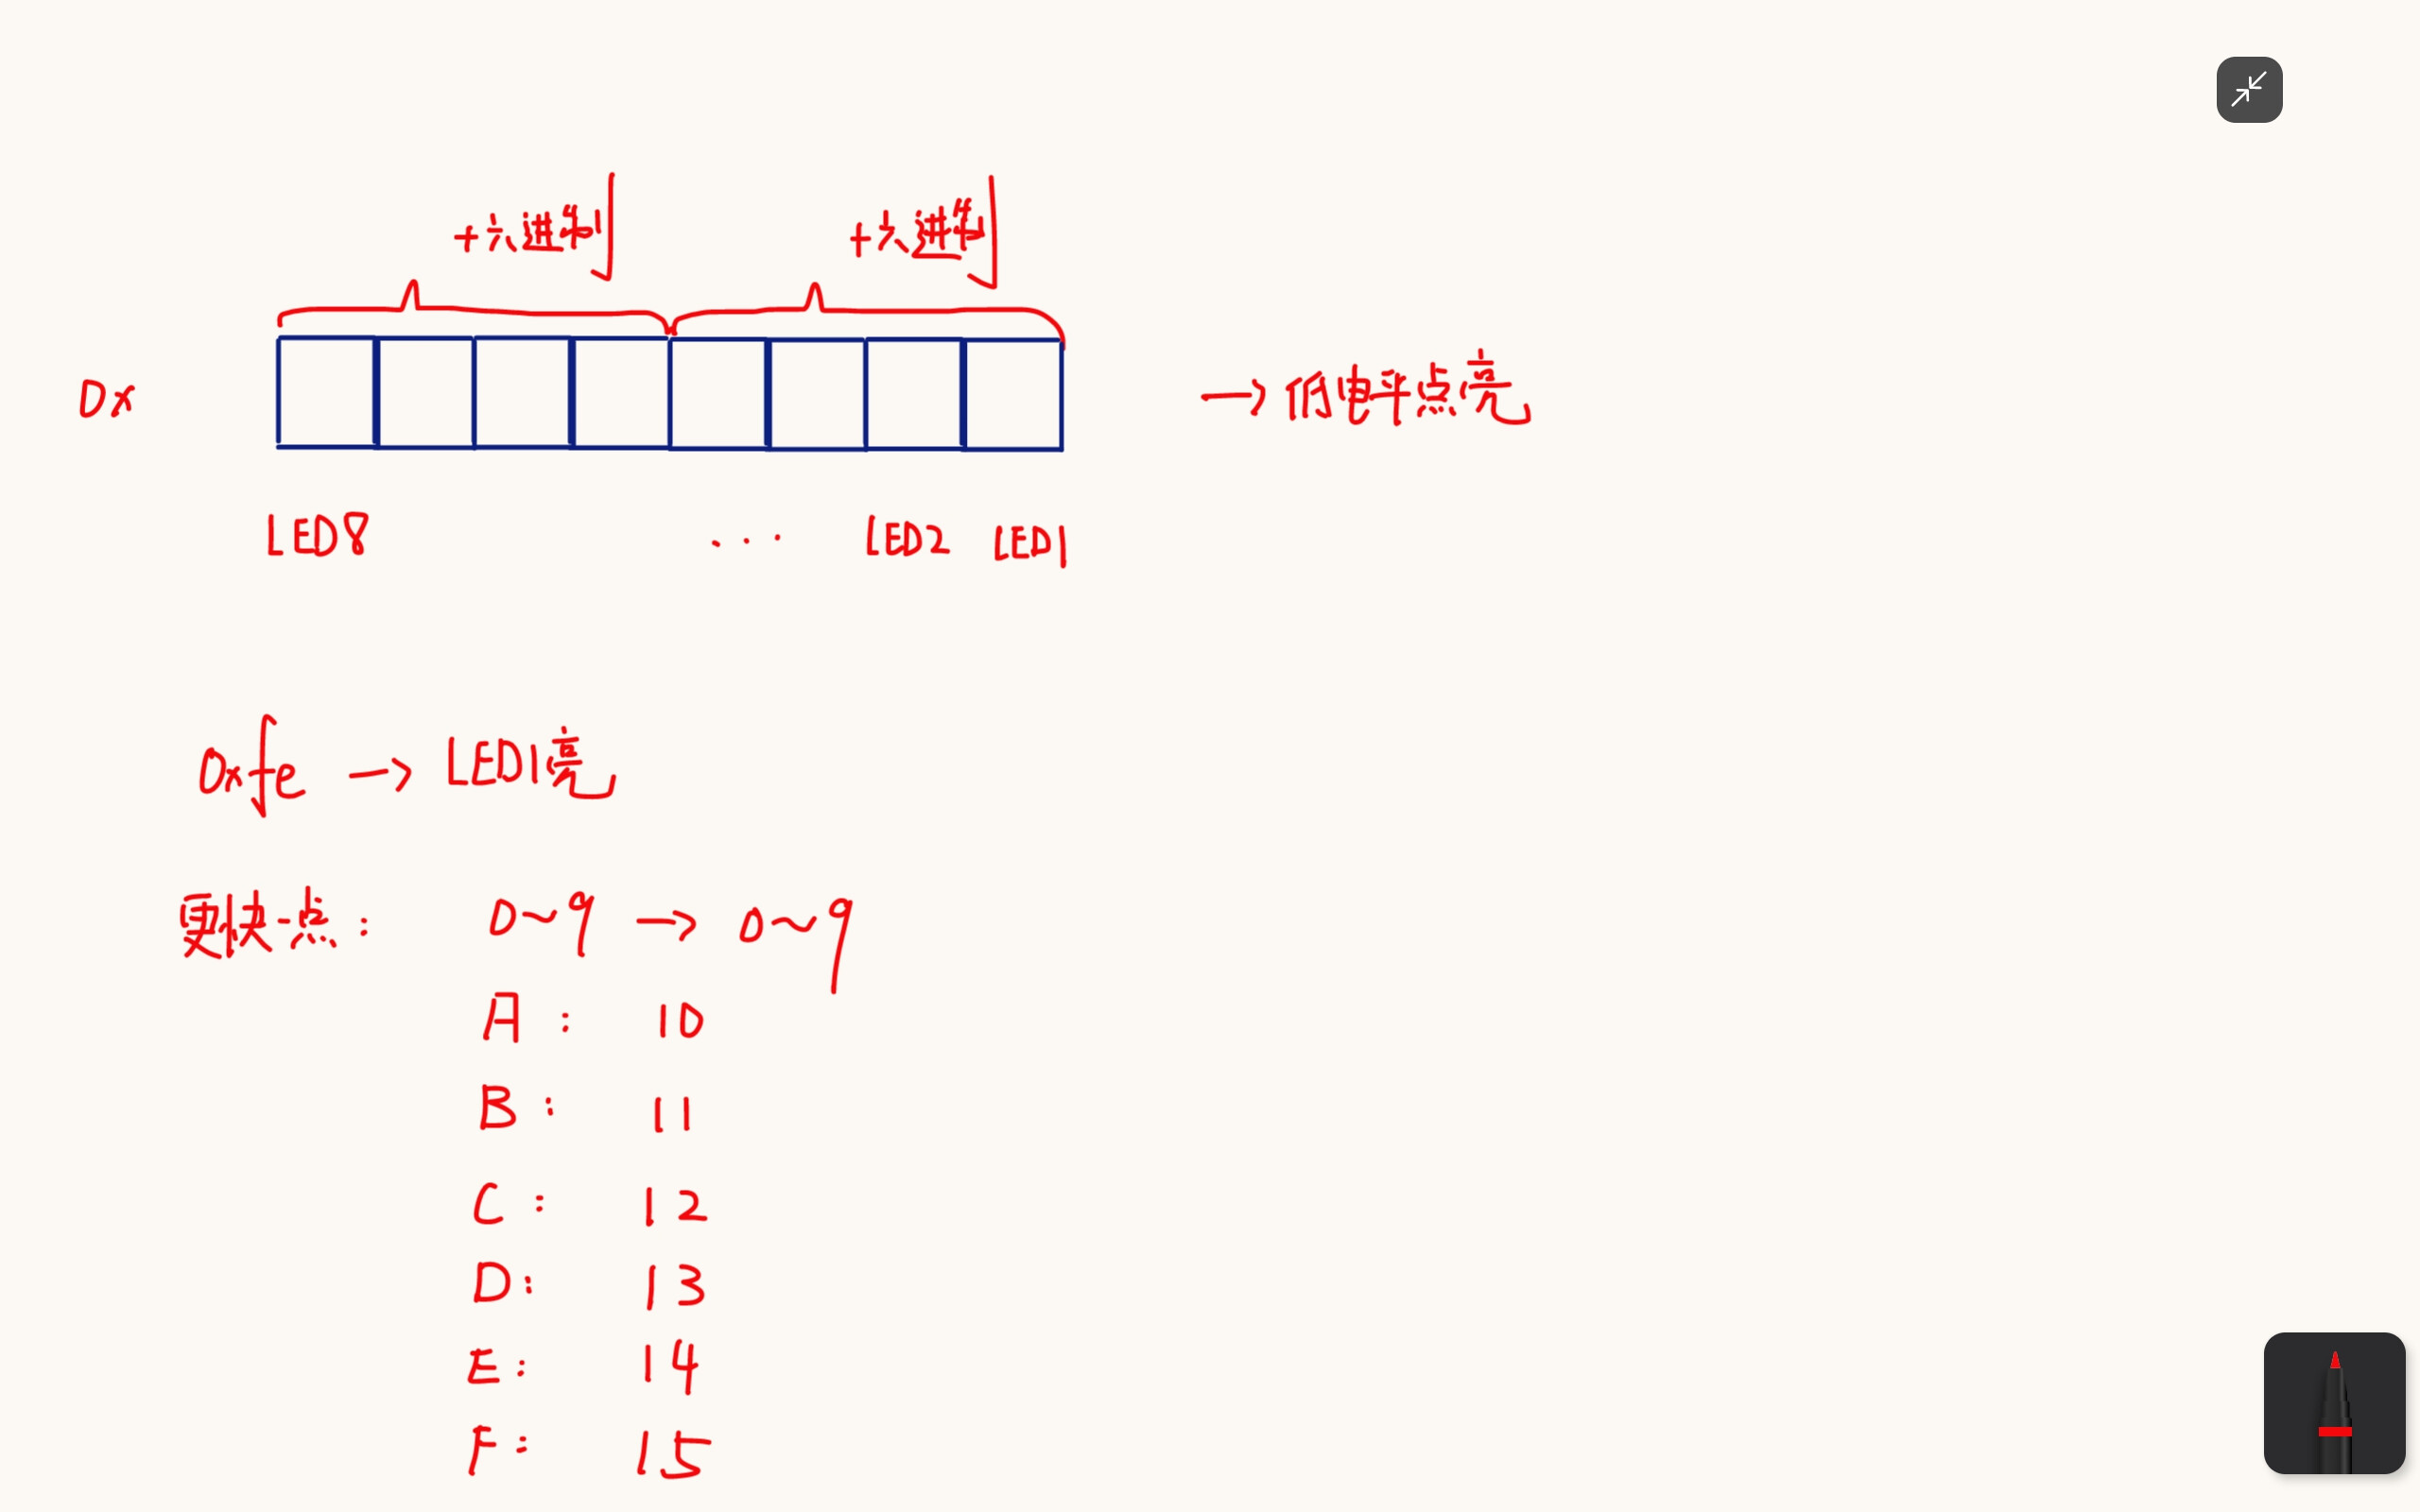
unsigned char ucLed = 0xfe; // 初始值 1111 1110,最低位为0,对应 LED 亮
/* Main 函数 */
void main()
{
while(1)
{
// 循环左移一位,实现流水灯效果
// _crol_:循环左移函数(需包含 intrins.h)
// _cror_:循环右移函数
ucLed = _crol_(ucLed, 1);
Delay(5); // 延时约 5ms
P1 = ucLed; // 输出到 P1 口
}
}
示例4:变速流水灯(延时时间逐渐缩短)
/* 头文件区域 */
#include "REG52.H"
#include "intrins.h"
/* 延时函数(调整了内部参数,延时更短) */
void Delay(unsigned char xms) //@12.000MHz
{
unsigned char data i, j;
while(xms--)
{
i = 2;
j = 239;
do
{
while (--j);
} while (--i);
}
}
/* 变量声明 */
unsigned char ucLed = 0xfe;
unsigned int time = 1000; // 初始延时时间较大
/* Main 函数 */
void main()
{
while(1)
{
ucLed = _crol_(ucLed, 1);
Delay(time--); // 每次循环延时递减,实现加速效果
P1 = ucLed;
}
}
说明:
-
以上示例基于 51 单片机,使用 12MHz 晶振。
-
延时函数的时间为近似值,实际延时受编译器优化等因素影响。
-
流水灯示例中,LED 通常低电平点亮(共阳接法),具体需根据硬件电路确定。
预备2 : 按键
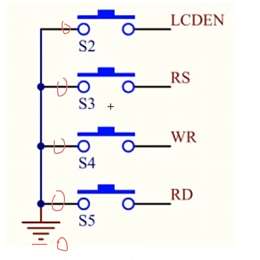
这里核心逻辑是: 按键按下之后,电路导通,单片机一侧的接收通道是接收低电平。
同样的,先熟悉一下比赛环境
独立按键
没在原理图上找到,先听课吧
 行 : P3_0, P3_1, P3_2, P3_3
 列 : P3_4, P3_5, P3_6, P3_7
示例1:独立按键控制LED
/*头文件区域*/
#include <REGX52.H>
#include "intrins.h"
/*延时函数*/
void Delay(unsigned char xms) //@12.000MHz
{
unsigned char data i, j;
while(xms--)
{
i = 2;
j = 239;
do
{
while(--j);
}while(--i);
}
}
/*变量申明*/
unsigned char ucLed = 0xfe;
unsigned int time = 1000;
unsigned char Key_Val, Key_Down, Key_Up, Key_Old;
/*按键读取函数*/
unsigned char Key_Read()
{
unsigned char temp = 0;// 这是一个标志位
if(P3_4 == 0) temp = 1;
if(P3_5 == 0) temp = 2;
if(P3_6 == 0) temp = 3;
if(P3_7 == 0) temp = 4;
return temp;
}
/*main 函数*/
int main()
{
while(1)
{
Key_Val = Key_Read(); //读取键码值
Key_Down = Key_Val & (Key_Val ^ Key_Old); //检测下降沿
Key_Up = ~Key_Val & (Key_Val ^ Key_Old); //检测上升沿
Key_Old = Key_Val; // 扫描辅助变量
if(Key_Down == 1) // 按键1下降
P1_0 = 0; // P1_0 亮
if(Key_Up == 2) // 按键2上升
P1_0 = 1; // P1_0 灭
if(Key_Old == 3) // key_Old如果一直按着
P1_1 = 0; // P1_1 亮
else
P1_1 = 1; // P1_1 灭
}
}
示例2: 使用按键控制LED流水灯状态
/*头文件区域*/
#include <REGX52.H>
#include "intrins.h"
/*延时函数*/
void Delay(unsigned char xms) //@12.000MHz
{
unsigned char data i, j;
while(xms--)
{
i = 2;
j = 239;
do
{
while (--j);
} while (--i);
}
}
/*变量申明*/
unsigned char ucLed = 0xfe;
unsigned char Key_Val, Key_Down, Key_Up, Key_Old;
bit System_Flag; // 申明标志位
/*按键读取函数*/
unsigned char Key_Read()
{
unsigned char temp = 0;// 这是一个标志位
if(P3_4 == 0) temp = 1;
if(P3_5 == 0) temp = 2;
if(P3_6 == 0) temp = 3;
if(P3_7 == 0) temp = 4;
return temp;
}
/*main 函数*/
int main()
{
while(1)
{
Key_Val = Key_Read(); //读取键码值
Key_Down = Key_Val & (Key_Val ^ Key_Old); //检测下降沿
Key_Up = ~Key_Val & (Key_Val ^ Key_Old); //检测上升沿
Key_Old = Key_Val; // 扫描辅助变量
if(System_Flag == 1)
{
ucLed = _crol_(ucLed, 1);
P1 = ucLed;
Delay(1000);
}
// if(Key_Down == 1)
// System_Flag = 1;
// if(Key_Down == 2)
// System_Flag = 0;
switch(Key_Down)
{
case 1:
System_Flag = 1;
break;
case 2:
System_Flag = 0;
break;
}
}
}
矩阵按键

矩阵按键的本质,就是选中行,再选择列
示例1:矩阵按键控制流水灯状态
/*头文件区域*/
#include <REGX52.H>
#include "intrins.h"
/*延时函数*/
void Delay(unsigned char xms) //@12.000MHz
{
unsigned char data i, j;
while(xms--)
{
i = 2;
j = 239;
do
{
while (--j);
} while (--i);
}
}
/*变量申明*/
unsigned char ucLed = 0xfe;
unsigned char Key_Val, Key_Down, Key_Up, Key_Old;
bit System_Flag; // 申明标志位
/*按键读取函数*/
unsigned char Key_Read()
{
unsigned char temp = 0;// 这是一个标志位
P3_0 = 0; P3_1 = 1; P3_2 = 1; P3_3 = 1; // 先选中第一行
if(P3_4 == 0) temp = 1;
if(P3_5 == 0) temp = 2;
if(P3_6 == 0) temp = 3;
if(P3_7 == 0) temp = 4;
P3_0 = 1; P3_1 = 0; P3_2 = 1; P3_3 = 1;
if(P3_4 == 0) temp = 5;
if(P3_5 == 0) temp = 6;
if(P3_6 == 0) temp = 7;
if(P3_7 == 0) temp = 8;
P3_0 = 1; P3_1 = 1; P3_2 = 0; P3_3 = 1;
if(P3_4 == 0) temp = 9;
if(P3_5 == 0) temp = 10;
if(P3_6 == 0) temp = 11;
if(P3_7 == 0) temp = 12;
P3_0 = 1; P3_1 = 1; P3_2 = 1; P3_3 = 0;
if(P3_4 == 0) temp = 13;
if(P3_5 == 0) temp = 14;
if(P3_6 == 0) temp = 15;
if(P3_7 == 0) temp = 16;
return temp;
}
/*main 函数*/
int main()
{
while(1)
{
Key_Val = Key_Read(); //读取键码值
Key_Down = Key_Val & (Key_Val ^ Key_Old); //检测下降沿
Key_Up = ~Key_Val & (Key_Val ^ Key_Old); //检测上升沿
Key_Old = Key_Val; // 扫描辅助变量
if(System_Flag == 1)
{
ucLed = _crol_(ucLed, 1);
P1 = ucLed;
Delay(1000);
}
// if(Key_Down == 1)
// System_Flag = 1;
// if(Key_Down == 2)
// System_Flag = 0;
switch(Key_Down)
{
case 1:
System_Flag = 1;
break;
case 2:
System_Flag = 0;
break;
}
}
}
示例2 : 矩阵键盘控制流水灯速度
/*头文件区域*/
#include <REGX52.H>
#include "intrins.h"
/*延时函数*/
void Delay(unsigned char xms) //@12.000MHz
{
unsigned char data i, j;
while(xms--)
{
i = 2;
j = 239;
do
{
while (--j);
} while (--i);
}
}
/*变量申明*/
unsigned char ucLed = 0xfe;
unsigned char Key_Val, Key_Down, Key_Up, Key_Old;
unsigned int Time = 500;
bit System_Flag; // 申明标志位
/*按键读取函数*/
unsigned char Key_Read()
{
unsigned char temp = 0;// 这是一个标志位
P3_0 = 0; P3_1 = 1; P3_2 = 1; P3_3 = 1; // 先选中第一行
if(P3_4 == 0) temp = 1;
if(P3_5 == 0) temp = 2;
if(P3_6 == 0) temp = 3;
if(P3_7 == 0) temp = 4;
P3_0 = 1; P3_1 = 0; P3_2 = 1; P3_3 = 1;
if(P3_4 == 0) temp = 5;
if(P3_5 == 0) temp = 6;
if(P3_6 == 0) temp = 7;
if(P3_7 == 0) temp = 8;
P3_0 = 1; P3_1 = 1; P3_2 = 0; P3_3 = 1;
if(P3_4 == 0) temp = 9;
if(P3_5 == 0) temp = 10;
if(P3_6 == 0) temp = 11;
if(P3_7 == 0) temp = 12;
P3_0 = 1; P3_1 = 1; P3_2 = 1; P3_3 = 0;
if(P3_4 == 0) temp = 13;
if(P3_5 == 0) temp = 14;
if(P3_6 == 0) temp = 15;
if(P3_7 == 0) temp = 16;
return temp;
}
/*main 函数*/
int main()
{
while(1)
{
Key_Val = Key_Read(); //读取键码值
Key_Down = Key_Val & (Key_Val ^ Key_Old); //检测下降沿
Key_Up = ~Key_Val & (Key_Val ^ Key_Old); //检测上升沿
Key_Old = Key_Val; // 扫描辅助变量
if(System_Flag == 1)
{
ucLed = _crol_(ucLed, 1);
P1 = ucLed;
Delay(Time);
}
// if(Key_Down == 1)
// System_Flag = 1;
// if(Key_Down == 2)
// System_Flag = 0;
switch(Key_Down)
{
case 1:
System_Flag = 1;
break;
case 2:
System_Flag = 0;
break;
case 3:
Time += 100;
break;
case 4:
Time -= 100;
break;
}
}
}
示例3 : 彩灯控制器
彩灯运行模式:
模式1:Led1 – Led2 – Led3 – Led4 – Led5 – Led6 – Led7 – Led8
模式2:Led8 – Led7 – Led6 – Led5 – Led4 – Led3 – Led2 – Led1
模式3:Led1+Led8 – Led2+Led7 - Led3+Led5 – Led4+Led6
模式4:Led4+Led6 – Led3+Led5 – Led2+Led7 – Led1+Led8
按键功能定义:
S1:彩灯系统启动按键
S2:彩灯系统暂停按键
S3:显示模式调整按键(运行模式+1)(若模式4+1后返回到模式1)
S4:显示模式调整按键(运行模式-1)(若模式1-1后返回到模式4)
初始化状态:
上电时,默认为模式1-启动状态,固定流转时间500ms/次
/*彩灯控制系统*/
// 注意,这份代码没有优化,也没用定时器,回头再来看看
/*头文件*/
#include <REGX52.H>
#include "intrins.h"
/*延时函数*/
void Delay(unsigned char xms) //@12.000MHz
{
unsigned char data i, j;
while(xms--)
{
i = 2;
j = 239;
do
{
while (--j);
} while (--i);
}
}
/*变量声明*/
unsigned char ucLed = 0xfe;
unsigned char Key_Val, Key_Down, Key_Up, Key_Old;
//unsigned char Led_State_1[8] = {0xfe, 0xfd, 0xfb, 0xf7, 0xef, 0xdf, 0xbf, 0x7f};
unsigned char Led_State_3[4] = {0x7e, 0xbd, 0xdb, 0xe7};
unsigned char Led_Mode = 1;
unsigned char i = 0, j = 0;
bit Led_Flag;
/*独立按键读取函数*/
unsigned char Key_Read(void)
{
unsigned char temp = 0;
if(P3_4 == 0) temp = 1;
if(P3_5 == 0) temp = 2;
if(P3_6 == 0) temp = 3;
if(P3_7 == 0) temp = 4;
return temp;
}
/*main*/
int main()
{
while(1)
{
// 按键消抖处理
Key_Val = Key_Read();
Key_Down = Key_Val & (Key_Val ^ Key_Old);
Key_Up = ~Key_Val & (Key_Val ^ Key_Old);
Key_Old = Key_Val;
if(Key_Down == 1) Led_Flag = 1;
if(Key_Down == 2) Led_Flag = 0;
if(Key_Down == 3)
{
P1 = 0x00;
Led_Mode++;
if(Led_Mode == 5)
{
Led_Mode = 1;
}
}
if(Key_Down == 4)
{
P1 = 0x00;
Led_Mode--;
if(Led_Mode == 0)
{
Led_Mode = 4;
}
}
if(Led_Flag == 1)
{
if(Led_Mode == 1)
{
P1 = ucLed;
Delay(500);
ucLed = _crol_(ucLed, 1);
}
if(Led_Mode == 2)
{
P1 = ucLed;
Delay(500);
ucLed = _cror_(ucLed, 1);
}
if(Led_Mode == 3)
{
if(++i == 4) i = 0;
P1 = Led_State_3[i];
Delay(500);
}
if(Led_Mode == 4)
{
if(++j == 4) j = 0;
P1 = Led_State_3[j];
Delay(500);
}
}
}
}
// 功能实现了,但是功能的分数不是很高
预备3:数码管
基本原理
数码管分为两个控制部分:
-
段选:控制数码管上具体哪一段LED亮灭,用于显示数字0-9
-
位选:控制6个数码管中具体哪一个被选中点亮
信号电平定义:
-
段码:本单片机采用高电平有效,给1亮,给0灭
-
位码:本单片机采用低电平有效,给0选中,给1不选
控制引脚分配:
-
P2_6:控制段选信号
-
P2_7:控制位选信号
静态数码管显示
变量声明
 unsigned char Seg_Dula[] = {0x3f,0x06,0x5b,0x4f,0x66,0x6d,0x7d,0x07,0x7f,0x6f,0x00};
 unsigned char Seg_Wela[] = {0xfe,0xfd,0xfb,0xf7,0xef,0xdf};
数码管显示函数
 void Seg_Disp(unsigned char wela, unsigned char dula)
 {
     // #1. 消隐操作(防止重影)
     P0 = 0x00;
     P2_6 = 1; // 开门(锁存器使能)
     P2_6 = 0; // 关门(锁存器锁存)

     // #2. 位选(选择要显示的数码管)
     P0 = Seg_Wela[wela];
     P2_7 = 1; // 开门
     P2_7 = 0; // 关门

     // #3. 段选(设置显示的数字)
     P0 = Seg_Dula[dula];
     P2_6 = 1;
     P2_6 = 0;
 }
静态数码管调用方法
Seg_Disp(0, 0); // 在第一个数码管上显示数字0
动态数码管显示
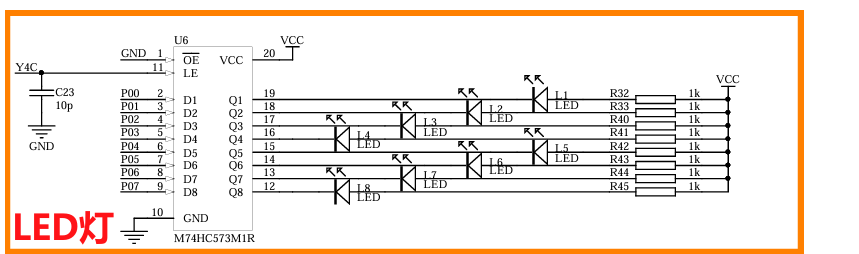
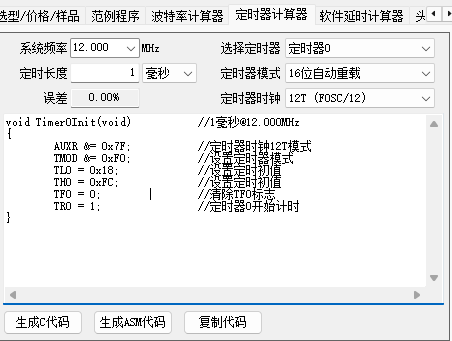
动态数码管显示需要使用定时器中断来实现扫描,避免使用延时函数阻塞程序运行。
定时器初始化
使用ISP工具初始化定时器设置
定时器初始化函数
 void Timer0_Init(void)        // 1毫秒@12.000MHz
 {
 //    AUXR &= 0x7F;            // 定时器时钟12T模式
     TMOD &= 0xF0;            // 设置定时器模式
     TL0 = 0x18;              // 设置定时初始值
     TH0 = 0xFC;              // 设置定时初始值
     TF0 = 0;                 // 清除TF0标志
     TR0 = 1;                 // 定时器0开始计时
     ET0 = 1;                 // 允许定时器0中断
     EA = 1;                  // 开启总中断
 }
定时器中断服务函数
 void Timer0Server() interrupt 1  // 中断序号为1
 {
     TMOD &= 0xF0;            // 设置定时器模式
     TL0 = 0x18;              // 重新设置定时初始值
 }
动态数码管显示模板
/* 头文件区域 */
#include <REGX52.H>
#include "intrins.h"
/* 延时函数 */
void Delay(unsigned char xms) // @12.000MHz
{
unsigned char data i, j;
while(xms--)
{
i = 2;
j = 239;
do
{
while (--j);
} while (--i);
}
}
/* 变量声明 */
unsigned char Seg_Dula[] = {0x3f,0x06,0x5b,0x4f,0x66,0x6d,0x7d,0x07,0x7f,0x6f,0x00};
unsigned char Seg_Wela[] = {0xfe,0xfd,0xfb,0xf7,0xef,0xdf};
unsigned char Seg_Pos; // 扫描位置变量
unsigned char Seg_Buf[] = {1,2,3,10,10,10}; // 显示缓冲区,默认显示{1,2,3}
unsigned char ucLed = 0xfe; // LED初始状态
unsigned char Key_Val, Key_Down, Key_Up, Key_Old; // 按键相关变量
unsigned int Time = 500; // 时间变量
bit System_Flag; // 系统标志位
/* 矩阵按键读取函数 */
unsigned char Key_Read()
{
unsigned char temp = 0; // 临时变量存储按键值
// 扫描第一行
P3_0 = 0; P3_1 = 1; P3_2 = 1; P3_3 = 1;
if(P3_4 == 0) temp = 1;
if(P3_5 == 0) temp = 2;
if(P3_6 == 0) temp = 3;
if(P3_7 == 0) temp = 4;
// 扫描第二行
P3_0 = 1; P3_1 = 0; P3_2 = 1; P3_3 = 1;
if(P3_4 == 0) temp = 5;
if(P3_5 == 0) temp = 6;
if(P3_6 == 0) temp = 7;
if(P3_7 == 0) temp = 8;
// 扫描第三行
P3_0 = 1; P3_1 = 1; P3_2 = 0; P3_3 = 1;
if(P3_4 == 0) temp = 9;
if(P3_5 == 0) temp = 10;
if(P3_6 == 0) temp = 11;
if(P3_7 == 0) temp = 12;
// 扫描第四行
P3_0 = 1; P3_1 = 1; P3_2 = 1; P3_3 = 0;
if(P3_4 == 0) temp = 13;
if(P3_5 == 0) temp = 14;
if(P3_6 == 0) temp = 15;
if(P3_7 == 0) temp = 16;
return temp;
}
/* 数码管显示函数 */
void Seg_Disp(unsigned char wela, unsigned char dula)
{
// #1. 消隐操作(防止重影)
P0 = 0x00;
P2_6 = 1; // 开门
P2_6 = 0; // 关门
// #2. 位选(选择数码管)
P0 = Seg_Wela[wela];
P2_7 = 1; // 开门
P2_7 = 0; // 关门
// #3. 段选(显示数字)
P0 = Seg_Dula[dula];
P2_6 = 1;
P2_7 = 0;
}
/* 定时器初始化函数 */
void Timer0_Init(void) // 1毫秒@12.000MHz
{
// AUXR &= 0x7F; // 定时器时钟12T模式
TMOD &= 0xF0; // 设置定时器模式
TL0 = 0x18; // 设置定时初始值
TH0 = 0xFC; // 设置定时初始值
TF0 = 0; // 清除TF0标志
TR0 = 1; // 定时器0开始计时
ET0 = 1; // 允许定时器0中断
EA = 1; // 开启总中断
}
/* 定时器0中断服务函数 - 每1毫秒执行一次 */
void Timer0Server() interrupt 1
{
TMOD &= 0xF0; // 设置定时器模式
TL0 = 0x18; // 重新设置定时初始值
// 扫描6个数码管
if(++Seg_Pos == 6) Seg_Pos = 0;
Seg_Disp(Seg_Pos, Seg_Buf[Seg_Pos]);
}
/* 主函数 */
int main()
{
Timer0_Init(); // 初始化定时器
while(1)
{
// 按键检测与处理
Key_Val = Key_Read(); // 读取键码值
Key_Down = Key_Val & (Key_Val ^ Key_Old); // 检测下降沿(按键按下)
Key_Up = ~Key_Val & (Key_Val ^ Key_Old); // 检测上升沿(按键释放)
Key_Old = Key_Val; // 保存当前按键状态
// 按键功能分配
switch(Key_Down)
{
case 1:
System_Flag = 1; // 启动系统
break;
case 2:
System_Flag = 0; // 暂停系统
break;
case 3:
Time += 100; // 时间增加100
break;
case 4:
Time -= 100; // 时间减少100
break;
}
// 更新数码管显示内容
Seg_Buf[0] = Time / 100 % 10; // 显示百位
Seg_Buf[1] = Time / 10 % 10; // 显示十位
Seg_Buf[2] = Time / 1 % 10; // 显示个位
}
}
说明:此模板实现了基于定时器中断的动态数码管扫描显示,配合矩阵按键实现系统控制功能。数码管显示缓冲区Seg_Buf存储要显示的数字,定时器中断服务函数Timer0Server负责循环扫描更新显示。